GitHub Actions으로 GitHub Pages에 배포하기
GitHub Actions을 이용하여 GitHub Pages에 블로그 사이트를 배포하였습니다.

GitHub Pages도 사용해서 블로그 사이트를 서비스하기로 하였습니다. 이전까지 사용하던 GitHub Pages를 버리기는 아까운 생각이 들더군요.
GitHub Pages는 기본적으로 jekyll 소스를 자동으로 빌드해서 배포하는 서비스 이지만, 정적 웹 페이지를 그대로 서비스하는 것도 가능합니다.
그렇기에, Hugo로 만든 블로그라고 할지라도 GitHub Pages에서 서비스가 가능합니다.
빌드 결과물을 배포하면 되는 단순한 작업이라서 GitHub Actions로 자동으로 하도록 하였습니다. 이 글에서는 그 방법을 적어보려고 합니다.
GitHub Actions이란?
Automate your workflow from idea to production
GitHub Actions makes it easy to automate all your software workflows, now with world-class CI/CD. Build, test, and deploy your code right from GitHub. Make code reviews, branch management, and issue triaging work the way you want.
공식 홈페이지의 소개문입니다만, 아이디어에서 생산까지의 작업 흐름을 자동화! 멋지네요.
GitHub의 모든 이벤트(commit, pull 등) 에서 실행시키는 것이 가능하다고 하는 군요.
준비
GitHub Pages Repository
{자신의 GitHub 아이디}.github.io 의 이름의 repository를 만듭니다.
정적 블로그 사이트 소스
위의 repository의 master branch에 넣어둡시다.
만들기
GitHub Actions 소스
다음 파일을 repository의 /.github/workflows 넣어두면 됩니다.
# This is a basic workflow to help you get started with Actions

name: CI

# Controls when the action will run. Triggers the workflow on push or pull request
# events but only for the master branch
on:
  push:
    branches: [ master ]

# A workflow run is made up of one or more jobs that can run sequentially or in parallel
jobs:
  # This workflow contains a single job called "build"
  build:
    # The type of runner that the job will run on
    runs-on: ubuntu-latest

    # Steps represent a sequence of tasks that will be executed as part of the job
    steps:
    # Checks-out your repository under $GITHUB_WORKSPACE, so your job can access it
    - uses: actions/checkout@v2

    - name: Setup Hugo
      uses: peaceiris/actions-hugo@v2
      with:
        hugo-version: '0.74.3'
        # extended: true

    - name: Build hugo
      run: hugo --gc --minify

    - name: Git init
      run: |
          git config --global user.name '${{github.actor}}'
          git config --global user.email '${{github.actor}}@users.noreply.github.com'

    - name: Git add
      run: git add --force public/

    - name: Git commit
      run: git commit -m "publish"

    - name: Push public to branch
      run: |
          git subtree split --branch public --prefix public/
          git push -f origin public:public
          git branch -D public
https://github.com/DuiNaru/duinaru.github.io/blob/master/.github/workflows/main.yml
그러면, master branch에 push가 있을 때 마다 위의 코드가 자동 실행되어서 빌드 결과인 public 폴더의 내용을 전부 public branch에 push하게 됩니다. 강제로 push하기 때문에, 혹시 public이라는 branch를 사용하신다면 Push public to branch에서 –branch 부분과 public:public 부분을 다른 branch로 바꿔주세요.
또한, 0.74.3 버전의 Hugo를 사용하였기에 Setup Hugo에서 Hugo를 설치하고, Build Hugo에서 Hugo로 빌드, Git add 및 Push public to branch에서 빌드된 public 폴더를 배포 대상으로 하였지만, 다른 정적 사이트 생성기를 사용하신다면 이 부분을 알맞게 바꿔주시면 됩니다.
Hugo를 extended 버전을 사용할 경우에 해당 주석을 해제하시면 됩니다.
Repository 설정
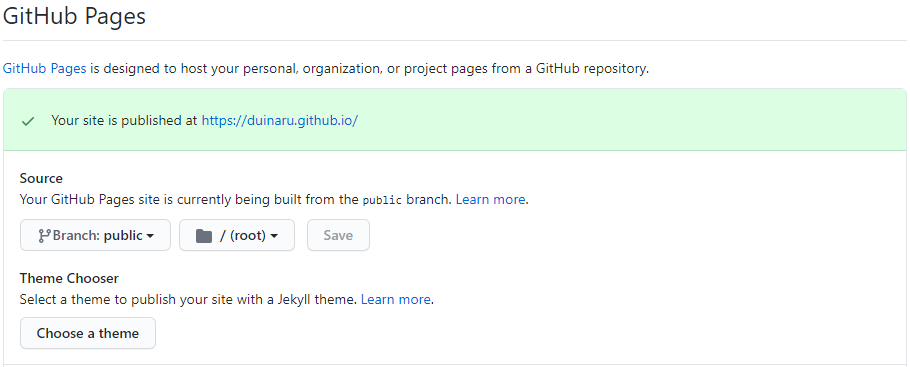
repository의 Settings에서 GitHub Pages의 Source Branch를 설정해줍니다.

GitHub Actions에서 public이라는 branch로 배포하게 해두었기 때문에, pubilc을 source branch로 지정하였습니다.
끝
push 이벤트가 발생하고 잠시 기다리면, GitHub Pages에 블로그 사이트가 서비스 되고 있을 것입니다.
필자가 사용하고 있는 Netlify CMS는 글을 작성할때마다 Pull Request가 발생하게 되어, master branch에 push하게 됩니다. 그 때마다, GitHub Actions이 실행되어 자동으로 배포 되기에 Netlify와 동일한 느낌으로 GitHub Pages로 서비스 할 수 있게 되었습니다.
이번에는 빌드-배포만 있는 정적 사이트라서 간단하지만, 추후에 구체적인 설정까지 사용하게 될 경우에는 어떻게 할 지 생각해봐야 할 듯합니다.


