GitHub ActionsでGitHub Pagesにデプロイ
GitHub Actionsを利用してGitHub Pagesにブログサイトをデプロイしました。
GitHub Pagesにもブログサイトをサービスすることにしました。
GitHub Pagesは基本的にjekyllから自動でビルドしてサービスになりますが、静的ウェブページをそのままサービスすることも可能です。
そのため、Hugoで作成したブログサイトであってもGitHub Pagesでサービスが可能になります。
ビルドした結果物をデプロイする単純な作業ですので、GitHub Actionsから自動的に行われるようにしました。この投稿ではその方法を書きたいと思います。
GitHub Actionsとは?
Automate your workflow from idea to production
GitHub Actions makes it easy to automate all your software workflows, now with world-class CI/CD. Build, test, and deploy your code right from GitHub. Make code reviews, branch management, and issue triaging work the way you want.
ホームページの紹介ですが、アイディアから制作までの作業の流れを自動化!素晴らしいです。
GitHubのすべてのイベント(commitやpullなど)で実行させることができるようです。
準備
GitHub Pages Repository
{GitHubのID}.github.io の名前のrepositoryを作成します。
静的ブログサイトソース
上記のrepositoryのmaster branchに入れておきます。
創り
GitHub Actions ソース
以下のファイルをrepositoryの /.github/workflows に入れておきましょう。
# This is a basic workflow to help you get started with Actions

name: CI

# Controls when the action will run. Triggers the workflow on push or pull request
# events but only for the master branch
on:
  push:
    branches: [ master ]

# A workflow run is made up of one or more jobs that can run sequentially or in parallel
jobs:
  # This workflow contains a single job called "build"
  build:
    # The type of runner that the job will run on
    runs-on: ubuntu-latest

    # Steps represent a sequence of tasks that will be executed as part of the job
    steps:
    # Checks-out your repository under $GITHUB_WORKSPACE, so your job can access it
    - uses: actions/checkout@v2

    - name: Setup Hugo
      uses: peaceiris/actions-hugo@v2
      with:
        hugo-version: '0.74.3'
        # extended: true

    - name: Build hugo
      run: hugo --gc --minify

    - name: Git init
      run: |
          git config --global user.name '${{github.actor}}'
          git config --global user.email '${{github.actor}}@users.noreply.github.com'

    - name: Git add
      run: git add --force public/

    - name: Git commit
      run: git commit -m "publish"

    - name: Push public to branch
      run: |
          git subtree split --branch public --prefix public/
          git push -f origin public:public
          git branch -D public
https://github.com/DuiNaru/duinaru.github.io/blob/master/.github/workflows/main.yml
そうすることで、master branchにpushがある度に上記のコードが実行されてビルドの結果物であるpublicのフォルダーの内容がpublic branchにpushされることになります。強制的にpushしていますので、もしもpublicというbranchが使用中であればPush public to branchで–branchとpublic:publicのところを異なるbranchに変えてください。
また、0.74.3のHugoを使用していまして、Setup HugoでHugoをインストールし、Build HugoでHugoでビルド、Git addとPush public to branchでビルドされたpublicのフォルダーをデプロイの対象としましたが、別の静的サイトジェネレータを使用した場合はこの部分を合わせて変えましょう。
Hugoをextendedバージョンで使用した場合も該当の注釈を解除しましょう。
Repository 設定
repositoryのSettingsからGitHub PagesのSource Branchを設定します。
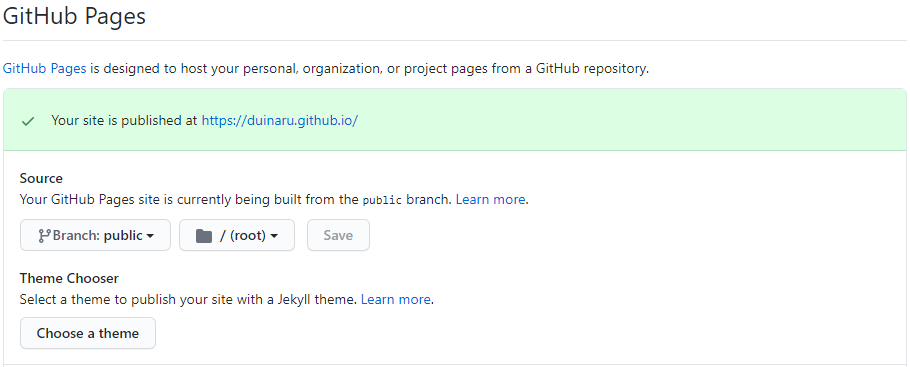
GitHub Actionsでpublicのbranchにデプロイするようにしましたので、pubilcをsource branchに設定しました。
終わり
pushイベントが発生してしばらく経つと、GitHub Pagesにブログサイトがサービスされているはずです。
筆者が利用しているNetlify CMSは投稿の度にPull Requestが発生され、master branchにpushします。その都度、GitHub Actionsが実行され、自動的にデプロイしますので、Netlifyと同じ感覚でGitHub Pagesをサービスすることができるようになりました。
今回はビルドとデプロイのみの静的サイトで簡単でしたが、細かい設定が必要になった場合はどうするかは工夫が必要になりそうです。